

/https%3A%2F%2Fprofilepics.canalblog.com%2Fprofilepics%2F1%2F7%2F174920.jpg)
/https%3A%2F%2Fstorage.canalblog.com%2F13%2F04%2F205804%2F13587551_o.jpg)
/https%3A%2F%2Fstorage.canalblog.com%2F64%2F67%2F205804%2F20040916_o.jpg)
/https%3A%2F%2Fstorage.canalblog.com%2F25%2F81%2F205804%2F20041048_o.jpg)
/https%3A%2F%2Fstorage.canalblog.com%2F86%2F52%2F205804%2F20040935_o.jpg)
/https%3A%2F%2Fstorage.canalblog.com%2F27%2F08%2F205804%2F20041024_o.jpg)
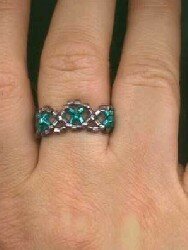
Bague couronne / Crown ring
Bonjour,
Aujourd'hui je vous propose de réaliser une bague toute simple : la bague couronne.
Matériel :
Perles de Rocailles Violettes (PRVio) (taille 11)
Perles de Rocailles Vertes (PRVer) (taille 11)
Fil de nylon diamètre 0,30 ou 0,35 (environ 1m)
Colle ou vernis transparent
1ère étape : Vous allez réaliser la base de la bague avec la technique du RAW (Right Angle Weave), enfilez 12 PRVio au milieu de votre fil et croisez les deux fils dans la 12ème perle, * puis enfilez 5 PRVio sur chaque fil et croisez les deux fils dans une 6ème PRVio*, répétez de * à * jusqu'à ce que vous ayez atteint le tour de votre doigt. !ATTENTION! n'enfilez pas la 6ème perle de la dernière boucle, vous croiserez les fils dans la 1ère PRVio enfilée au début de votre bague pour fermer celle-ci. Passons maintenant à l'étape 2…

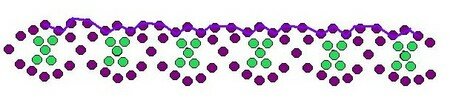
2ème étape : Suivez le dessin ci-dessous, il s'agit cette fois d'ajouter 5 PRVer à chaque boucle, en croisant les fils dans la PRVer du milieu. Suivez les fils rose et bleu jusqu'à finir le tour de votre bague.

3ème étape : Nous allons travailler sur le haut de la bague seulement (d'où son nom de "couronne"), suivez le fil bleu. Vous ajouterez 2 PRVio entre chaque boucle (suivez le schéma ci-dessous).

VOTRE BAGUE EST TERMINEE :o))
Une variation de la bague couronne :
Voici une autre bague que vous pouvez réaliser à partir de la bague ci-dessus ; simplement, réalisez le bas de votre bague comme vous venez de perler l'étape 3 de votre bague couronne.

A bientôt. Marylo, La Rêveuse
Hello
Today, I offer you to bead a very simple ring : the "Crown ring". Two rings, in fact, for you'll have a variation of the first one.
What you'll need:
Purple Seed beads (10/0 or 11/0)
Green Seed beads (10/0 or 11/0)
Nylon thread (from 0,25 to 0,30) (about 1 meter)
Glue
Follow the diagrams below to bead your ring:
First step : We'll use the Right Angle Weave technic: put 5 PSB (Purple Seed Beads) on each thread and then cross both threads through a sixth PSB. Repeat this all along the length of the finger, end with a sixth bead. Go to second step where you'll close the ring.

Second step : Close your ring by *passing both threads through the two first PSB of the first loop beaded on first step. then, add 1 GSB (Green Seed Bead) on each thread, cross the threads through a third GSB and add 1 more GSB on each thread, then pass the thread back throug the two last PSB of the first step first loop, cross both threads through the first sixth beads* and repeat from *) to *) until you've add GSB on every loop of your ring.

Third step: Now, we'll add two PSB above each loop. Pass your thred (on one side only) through the three PSB of every loop and add 2 PSB between every set of 3 PSB already beaded (see diagram below). Go on until you've pass through every loop of your ring. Pass both thread through the beads already beaded until both threads are blocked. Cut the threads.
YOUR RING IS DONE!
A variation:

Repeat third step on the opposite side of the ring. Here is another ring done!
LOL (Lots of Love). Marylo, The Dreamer


/https%3A%2F%2Fstorage.canalblog.com%2F84%2F43%2F205804%2F133525914_o.jpg)
/https%3A%2F%2Fstorage.canalblog.com%2F47%2F80%2F205804%2F132566474_o.jpg)
/https%3A%2F%2Fstorage.canalblog.com%2F40%2F96%2F205804%2F132566608_o.jpg)
/https%3A%2F%2Fstorage.canalblog.com%2F24%2F45%2F205804%2F132564489_o.jpg)